Fresco Painting An Orthodox Church
Fig 1. Saint Seraphim's Orthodox Church, Santa Rosa, California, view to the east. The panel icons of the icon screen, and the Virgin Enthroned in the Apse are painted in egg tempera. The rest of the walls shown are painted in fresco. Frescoes are planned for the remaining walls, columns and arches, as well as the dome.
What is a “Fresco”?
A Fresco is a wall painting in which pure pigments, ground only in water, are applied to freshly laid, still damp lime plaster. As the lime plaster dries, carbonate crystals form on the surface of the plaster, which bind with the particles of pigment, hardening around them, and adhering them permanently to the wall surface. In fact, the colors become an integral part of the structure of the plaster itself. This binding occurs only during the drying time of the plaster. Once the plaster has dried, further applications of color will not adhere. The time available for painting in fresco is rather short: usually up to 10 hours or so from the time the plastering is completed.[1] For this reason, a large fresco is usually done in several sections, each finished – or at least almost finished – in one day.
It has become common in modern times to refer to any wall painting (or mural) as a “fresco,” but this is, strictly speaking, inaccurate. “Fresco” is an Italian word, which means, “fresh.”[2] What is fresh is the plaster upon which the fresco is executed. Only paint applied to a freshly laid, damp plaster can accurately be called a fresco. All methods of painting where the pigments are mixed with a binding medium (egg yolk, linseed oil, acrylic polymer) and applied to a dry plaster are called, “secco” (Italian for “dry”).[3]
The art of fresco painting is ancient. Practiced in the Classical and Hellenistic periods of Greek art, it was brought to technical perfection by the Romans, who provide most of the surviving examples of fresco painting from the ancient world.[4] Christians continued to make use of this medium, and wall paintings of churches throughout the Byzantine era were executed in fresco.[5] Regrettably, it is very rare to see it used in Orthodox Churches today. There may be easier ways to create a mural, but none more beautiful or long lasting. One need only stand in a medieval Orthodox Church to experience the unique stillness and depth of a genuine fresco.
In this essay, I will briefly explain the process of fresco painting (the plastering and the application of colors) and show how we, in the icon painting workshop of our monastery, are using these techniques to paint churches.[6] The accompanying illustrations are of frescoes that we have painted in Saint Seraphim's Orthodox Church, Santa Rosa, California, between 1997 and 2004. The construction of the church was completed in 1994, and its first frescoes were painted in 1997.
Footnotes 1 - 6:
1 The time available for painting varies according to the school and technique of the workshop as well as to atmospheric conditions. There is evidence that in Byzantine churches, the plaster remained damp, and therefore “paintable” for several days, based on the large size of individual sections of finished frescoes.
2 In English speaking countries, much of the terminology of fresco painting is expressed in Italian, as Italian schools of fresco painting have supplied much of the training of fresco painters in the West. Some of these terms have no English equivalent.
3 For example, a mural painted in egg tempera or acrylic paint would be correctly identified as a “secco” painting.
4 See Harold Osborne, The Oxford Companion to Art, (Oxford University Press, 1970) p.444-446. See also Mora, Mora, and Philippot, Conservation of Wall Paintings Vol. I, (IICROM, 1984), p. 83-101. In his treatise, De Architectura (“On Architecture”), Vitruvius, a Roman architect writing at the end of the 1st century, BC, details the technique of fresco painting in great detail. The famous murals of Pompeii and Herculaneum are frescoes.
5 See David Winfield, Middle and Later Byzantine Wall Painting Methods, A Comparative Study, (Dumbarton Oaks Papers, number 22 1968) p. 62-138. See also Ormylia _____________
6 Our fresco technique is influenced by two primary sources: (1.) Technical training. One of our painters studied fresco painting in France, at L’Ecole de Beaux Arts, Paris, and at San Francisco State University, under the instruction of Stephen Pope Dimitrov and Lucienne Bloch, assistants to Diego Riviera, Mexican muralist who worked extensively in fresco in North and Central America. (2.) The study and observation in situ of Byzantine Churches, 12th to 16th century (in Greece, Turkey, Macedonia, and Serbia.)
The Materials of Fresco Painting
The colors of the fresco are made by grinding pigments in pure water. We might define “paint” as pigment mixed with a binder or medium (such as egg yoke, linseed oil, or acrylic polymer) which binds the particles of pigments together and adheres them to whatever is being painted: walls, panels, canvas, or paper. In fresco painting, there is no binder added to the pigments. The wall itself is the binder. A stone-like paint surface forms due to the chemistry of the distinctive plaster, made from lime putty, used in fresco painting.
Lime putty is the component of the fresco that modern people would know least, but it is the ingredient in the painting process that must be examined in order to understand fresco painting. Lime was the essential building material of the ancient and medieval worlds, being the chief ingredient of the mortar and cement that held together most structures, buildings large and small. It was also used to make the plaster that covered the walls of these buildings.
Lime putty is made by burning marble or limestone (calcium carbonate) in a kiln, where it becomes “quicklime” (calcium oxide). It is then submerged in water, where it disintegrates in an explosive reaction, becoming, by its reaction with the water, a thick, viscous paste called lime putty (calcium hydroxide). Lime putty is stored in pits, or in large buckets where it will stay soft indefinitely, provided as it remains under water. Normally, the lime putty is left to age for many years, as its handling improves with time.
In fresco, the wall is covered with several layers of lime plaster, and the painting is done on the final, freshly laid layer of plaster. To make plaster, lime putty is mixed with sand (or another aggregate such as crushed brick). When the plaster is spread out onto a wall, the lime putty, coming into contact with the air, begins to dry, and it becomes calcium carbonate again (chemically identical to marble). While the plaster is drying, and only during this brief time, the carbonate crystals form a hard, invisible crust on the surface of the plaster, which solidly binds the pigments applied by the painter. In a sense, the lime plaster wall, together with the colored surface, becomes a marble sandstone. When the day’s work is complete, the edges of the finished fresco are trimmed, and the excess plaster is scraped away with a trowel. If, at the end of the drying time, the work is unfinished, or badly done, the plaster is scraped off, and the fresco is repainted the following day.
Plastering the Walls
Normally, several layers of plaster are trowelled onto the walls to be painted.[7] The first layer, made with a high proportion of gritty sand, is scratched with a metal comb before it dries, leaving it very rough. The next layer is a little smoother, made with finer sand, and a higher proportion of lime putty, but left rough enough to hold the final layer of plaster. These two layers of plaster are usually put onto the wall ahead of time, and may be left to dry for a very long time. The final layer of plaster (the painting layer) is to the wall applied one small piece at a time, immediately prior to painting, usually the night before. The plasterers apply a section of the final plaster only as large as the painters can paint in one day. In the past, fresco could only be executed on a stone or brick wall, limiting its use considerably. The 20th century has offered an invaluable aid to fresco painters, and that is “expanded metal lathe,” a heavy wire mesh that can be secured to any stable structure, (even a sturdy wood-framed wall) which can hold heavy layers of plaster in place. Portable frescoes (large and small) can also be made with this valuable material. The metal lathe allows for frescoes to be painted in buildings formerly considered to be impossible to fresco. Many of the frescoes at St. Seraphim’s Orthodox church are held in place by metal lathe.[8]
Footnotes 7 - 8:
7 Different eras and schools employ varying recipes for the construction of the plaster wall. Historically, 3 layers of plaster would be the norm, but there may be as few as 2, or many more then 2.
8 For excellent overviews of the plastering and painting process for fresco, see Kurt Wehlte, The Materials and Techniques of Painting, (Kremer), p.246-261; Ollie Nordmark, Fresco Painting, (American Artists Group, 1947); and Gardner Hale, The Technique of Fresco Painting, (Dover, 1966)
The Design of the Iconographic Program of the Church
Before designs for individual wall paintings can be drawn, the overall iconographic plan for the church must be made. A detailed discussion of this plan lies outside the scope of this essay. In very broad outline, however, the plan is developed in 3 cycles: (1) the Dogmatic Cycle: a large, central icon of Christ in the dome (if there is one), then a large icon of the Virgin and Child (or Virgin in Prayer) in the apse; (2) the cycle of the Church Festivals at the top of the walls or on the ceiling; and (3) the cycle of the Saints at the ground level, surrounding the congregation. Several books and articles describe and explain this eloquently, but the best guides are the ancient churches themselves, particularly those of the 11th to 15th centuries, which set the iconographic before us with a clarity and simplicity that need little explanation. It can be very difficult to apply the traditional plan to newly built churches, which may utilize architectural designs or components that do not correspond to any of the traditional architectural plans. In this case, the iconographer must understand the tradition well enough to design a program for such a church that fits the building structure, yet remains faithful to the theological arrangement of the icons. Once the overall plan has been established, the designs for the individual icon murals are made.
Footnotes 9 - 11:
9 If the church has no dome, the icon of the Savior is moved to the top of the east wall, or the top of the east apse, and the icon of the Virgin is moved to the area below that of Christ.
10 If there is room, a cycle of the Miracles of Christ may be included between cycle of the Festivals and that of the Saints.
11 For a fuller description of the iconographic plan, see Constantine Carvarnos, Guide to Byzantine Iconography, (Holy Transfiguration Monastery, 1993) volume 1, part 2, chapters 1-3. See also Otto Demus, Byzantine Mosaic Decoration, (Routledge & Kegan Paul, 1948) p.16-30.
Fig 2a. A toned drawing, the cartoon for a fresco of St. Basil the Great.
Fig 2b. The finished fresco. A tracing was made from the cartoon, and transferred to the wet plaster to make the fresco.
Drawing, Preparation and Transfer of the Cartoon
For most applications, including iconography, fresco demands that the subject and composition be entirely worked out ahead of time. Minor corrections are possible, but it is safe to say that every minute counts and every brush stroke is permanent. This necessitates the elaborate cartoons and sketches typically used in fresco painting. The initial design of the fresco is worked out in a small drawing. A grid is drawn over the sketch, in order to be able to redraw it at any scale. A full sized cartoon is made, containing all the details of the finished fresco. A tracing is then made of the cartoon, which will be used to transfer the drawing of the cartoon onto the wall. In our workshop, we make full sized cartoons on toned paper, allowing us to study the light shapes of the icon as well as the lines and shadows (Fig 2). A large composition may require several full-scale cartoons that are then pieced together. Finally, it must be said that the use of cartoons and tracing seems to be a relatively modern practice. Close examination of the great Byzantine frescoes of the 11th to 16th centuries demonstrate that the initial drawings on the walls were done directly on the fresh plaster “freehand,” with compasses and rulers to mark proportions.[12]
12 Winfield, Ibid, p. 90-96
The Sinopia
Fig 3. The east wall showing the sinopia drawing of the fresco of the Ascension.
Designing a fresco involves other challenging preparations, in addition to the discipline of making a good drawing. The fresco may be high up on the wall, or on a curved surface, and drawings and designs may need to be sized, altered, and sometimes even “distorted” to fit the architecture. A drawing called a sinopia[13] is often sketched directly onto the rough plaster that will eventually be covered with the final painting layer. Why make drawings that will only be covered up by the plaster? As a working fresco painter, I have noted at least three purposes served by the sinopia. First, it serves as a guide for the last layer of plastering, particularly when the composition is large, requiring several sections of plaster. Second, it allows the painter to see the whole composition of the wall while painting a small section of it (Fig 3). Third and most importantly, it is the final step in the design of the fresco, enabling the painter to see it in relation to the rest of the church. The mural icon differs from the panel icon with regard to the context in which it is viewed. The panel icon, although often part of an ensemble of icons, may be seen by itself, as it is portable. A mural icon, however, will only be seen as part of the greater ensemble. It is of the utmost importance that the individual parts be properly proportioned and laid out in relation to each other and the whole. Seeing the interior of the church as a whole is particularly important when painting an Orthodox Church, as the entire church is seen as one large icon (see below.)
Fig 4. The sinopia drawing of the dome: The Pantocrator surrounded by Angels and Archangels, the Prophets are shown in the drum below.
An example of the usefulness of the sinopia can be seen at St. Seraphim’s Orthodox church, where the dome in the center of the church was recently reconstructed. The original dome (not yet painted with icons) had been poorly built, and tended to leak in a heavy rain. When the new construction was complete, the interior of the new dome was plastered with the first two layers of lime plaster for fresco. While the scaffolding was still in place, we seized the opportunity to design the whole dome program (the Pantocrator, Angels, and Prophets), and put a sinopia drawing on the second coat of plaster (Fig 4). When the scaffolding came down, and the drawing was visible from the ground, we were able to note some changes of scale and proportion that we will make before the painting commences.
13 The sinopia was named historically after the reddish colored pigment that was traditionally used for it.
Painting
The painting day begins hours before the brush comes into contact with the wall. The materials are assembled in the church. If the fresco is high on the walls or ceiling, scaffolding is erected, and the workshop is hoisted up into the air. In our studio, the plastering of the final coat of plaster occurs from about midnight until 6 AM. After being trowelled onto the wall, the painting layer is left to set until it is firm, then is smoothed and polished to a fine finish. At some time before daybreak, the tracing of the cartoon is placed onto the damp plaster. The drawing is traced over one more time with a sharp metal stylus, pressing the lines of the drawing into the still impressionable plaster. Then the painting begins, and continues uninterruptedly until the completion of the work, or until the plaster is too dry to fix any more pigment, usually early evening.[14]
Fig 5. The Prophet Isaiah: initial drawing on the damp plaster.
The painting of the mural icon follows a very similar pattern to the painting of an egg tempera icon, with regard to the order of the layers of paint. First, the icon is drawn directly on the fresh plaster. We use red ochre, a color that will have a pleasing appearance even when it shows through the other layers of color (Fig 5).
Early in the day, the plaster is very damp, and the color takes longer before it is fixed to the wall but once the red lines of the drawing are fixed (from the carbonization of the lime), and do not wash away, the painter knows that the curing of the wall is accelerating, and he begins to work quickly. As the day progresses, the plaster hardens and cures. After a few hours, the plaster reaches its optimum degree of curing, and for the next few hours, it seems as though the wall sucks the paint from the brush. Each brushstroke becomes immediately permanent. Large areas of flat color (Greek: proplasmos, Russian: sankir) cover the drawing, including the figures, the architectural details, and the background. These colors are normally built up in several thin layers. Next, the lines of the drawing and shadows (Greek: grapsimata; Russian: rospis') are painted on top of the flat colors.
The lighter areas of the flesh, garments and architecture are built up by one of two traditional methods. The painter may paint in the shadows of the forms first, and add thin glazes of color over the areas that are to remain light. In this technique, the white plaster of the wall, shining through very transparent tones of color, provides the light tones of the icon. Frescoes of the early and middle Byzantine period, and of the early Russian period, were usually done according to this method.[15] The second method of painting the light areas of faces and garments (Greek: sarcomata and lamata; Russian: okhreniia) is to build them up with paint that is made lighter in tone by the addition of white pigment. Historically the same lime used to make the plaster was used as a white pigment but today the painter may also use newer, modern pigments such as titanium white.
Fig 6. Saints Paul and Matthew, Details from the Ascension. On the left, the figures have the base colors, lines, and shadows. On the right, the finished icon.
It is here that late medieval Byzantine Fresco painting adds another step to the fresco painting technique, a phase of the painting that is, technically speaking not fresco, but secco. In the late Byzantine period, the light areas of color were done after the wall had dried (or partially dried) by adding egg, or some other organic binder, to the pigments, giving these particular parts of the painting visual solidity and opacity (Fig 6).[16] In our workshop, we also mix a little pure lime putty with the egg-tempered pigments at this stage. Since this part of the process is happening the day after the fresco painting of most of the colors, the lime plaster is still somewhat damp. The behavior of this paint mixture is quite interesting. The lime/egg tempera brushstrokes of paint become permanent in minutes, something that certainly does not happen with egg tempera under normal circumstances. Something between fresco and secco is happening here, and some degree of carbonization may be occurring. Observation of Byzantine frescoes shows that these rather opaque light forms on faces, hands, and garments have proved to be as durable as the pure fresco areas (at times, more durable). There is a need for further study of this phenomenon.
The final details, such as the lines of the halo and the inscriptions are also usually done in secco, with lime and egg added to the colors for strong adhesion.
Over a time period as long as the Byzantine era and encompassing so many schools and techniques, it is not always possible to describe one single method of painting to which each great monument adheres exclusively. There are a variety of techniques and approaches, sometimes combined with one another in the same church.
Footnotes 14 - 16:
14 The timetable of the fresco is not precisely predictable, as weather and conditions of the different walls influence the rate of curing of the plaster.
15 See (Ovchinnikov article in issue 2 of Iconofile). An example of this technique is the Church of the Panagia tou Arakos (Our Lady of Arakos), Lagoudera, Cyprus (late 12th C).
16 The majority of extant Byzantine frescoes are painted in this way, and there are many examples to be seen of this technique: The Church of the Protaton, Mount Athos, Greece (late 13th C), the Church of Saint Nicholas Orphanos, Thessalonica, Greece (Early 14th C); the Church of the Savior in Chora (Kariye Djami) in Constantinople (14th C), to name but three. For an indepth explanation of this and other techniques of fresco painting used by Byzantine iconographers, see Winfield, Ibid. Winfield’s conclusions are made from direct observation of the frescoes themselves during much fieldwork, including conservation and restoration. See also, Ormylia, Ibid. The conclusions of this study are based on painstaking microscopic analysis of paint and plaster samples taken from the Church of the Protaton. For further reading on the practices of painting some of the “fresco” in secco, see Mora et al. Chapters 5-7.
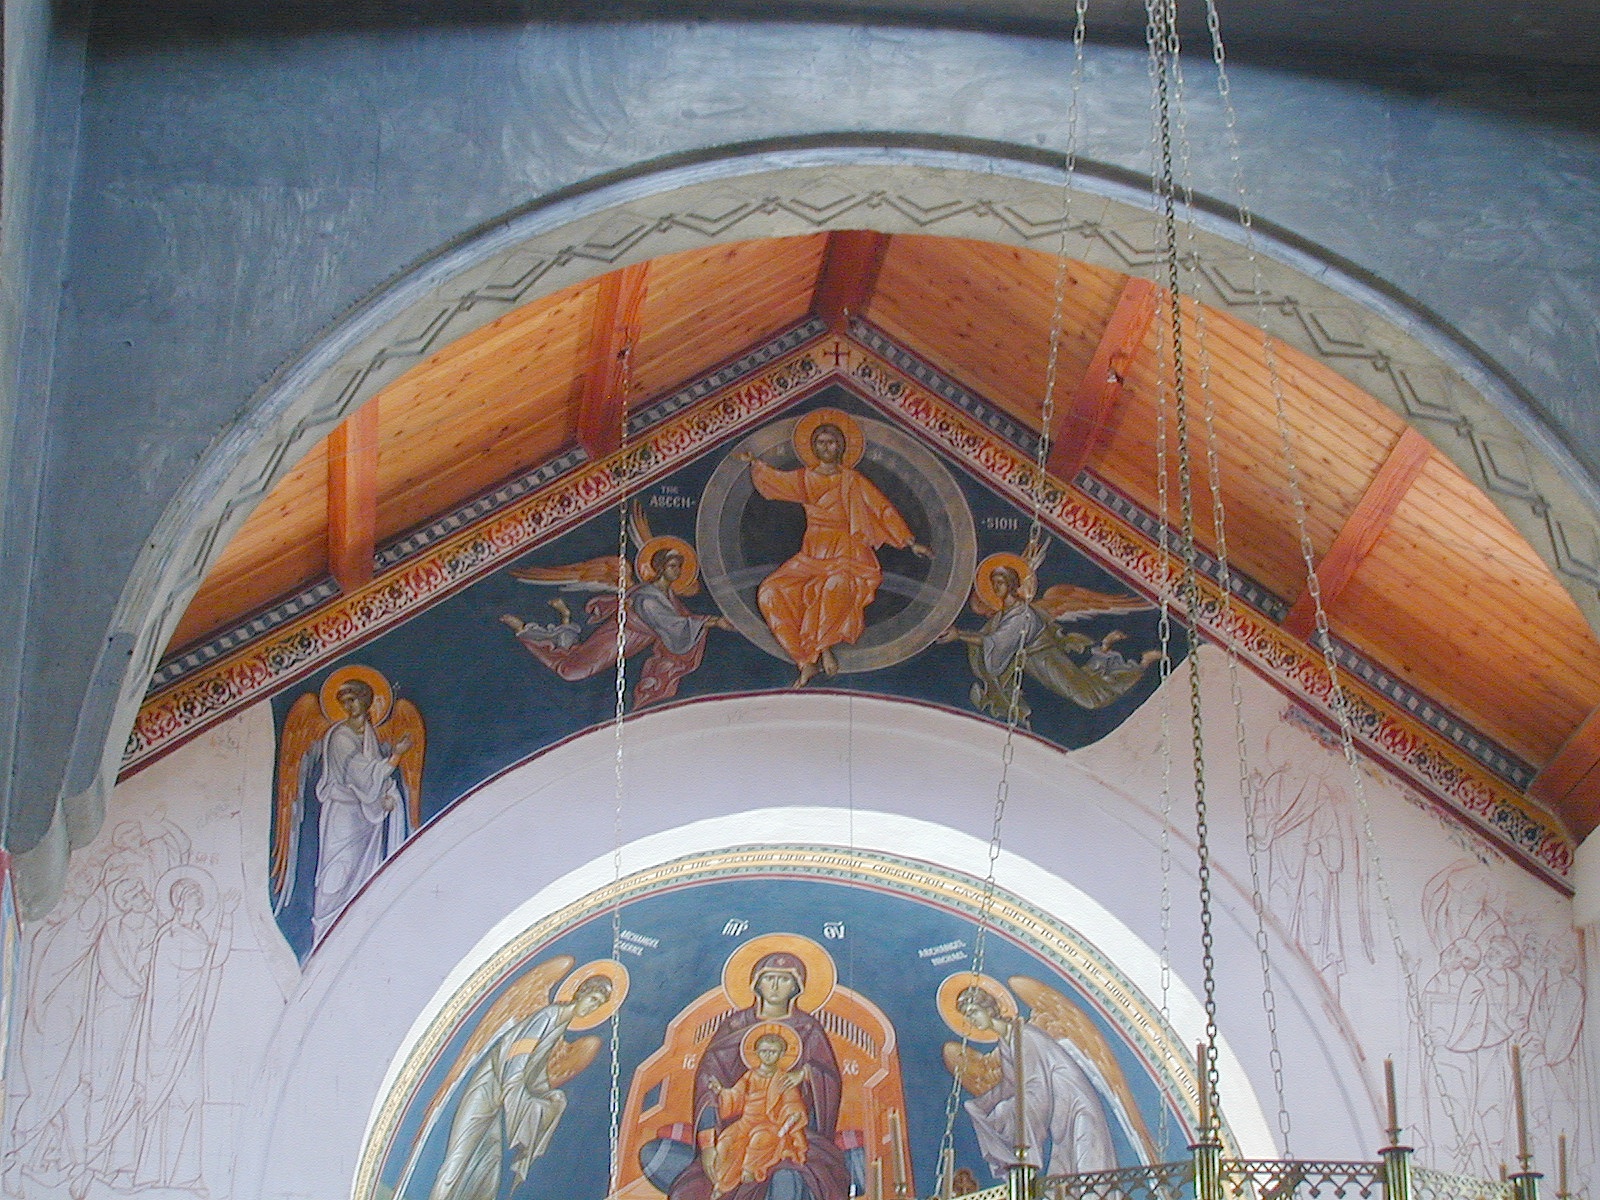


Fig 7. The progression of the Ascension fresco as it moves down the wall. In the last photo the plaster joins of the fresco are outlined in white. In the church, these joins are difficult or impossible to see from the ground.
Frescoes with Several Sections: Plaster Joins
If a fresco is large or complex, and more than the painter can paint in one fresco session, it is painted in several sections. At the end of a day’s work, the finished fresco portion is carefully trimmed, and the excess plaster scraped away with a trowel.[17] The next section of plaster is carefully applied up to the edge of the previous work, which makes a plaster join.[18] The joins are located along simple lines in the composition, such as a wall, or the contour of a figure. If the plasterer is skilled and careful, the joins are impossible to detect under normal viewing circumstances. In Saint Seraphim’s church, the fresco of the Ascension has been painted in 14 sections, as the composition was large and complex. The walls are painted from top to bottom, to protect the finished areas of painting. Any fresco below one that is in progress is in danger of being ruined by water and plaster dropping from above (Fig 7).
Footnotes 17 - 18:
17 It is standard practice to plaster a little more than the area to be painted, providing plaster that can be precisely trimmed, and also that can provide test areas for the colors.
18 Some writings and workshops prefer to use the Italian word for a fresco’s plaster joins: giornate (from the Italian word for “day”), as it usually marked a single day’s work.
In the Altar, (Fig 8) the Church Fathers on the ground level were each painted in one session of fresco painting. The Communion of the Holy Apostles above the Fathers, although much smaller in scale, was painted in smaller sections, due to the complexity of the icon (nine sections of fresco altogether). In the apse above, the Enthroned Virgin and Child was painted in egg tempera, but in such a way that the paint quality would be harmonious with the frescoes that surround it. The medium of an icon, be it a wall painting or a panel painting, is selected according to many criteria: the surface to be painted, and the materials and skills available to the painter. At times, several media are used in the same church. At Saint Seraphim’s, we have used three different media for the walls. In the narthex, for the large mural of the Pantocrator over the door to the nave, we used casein tempera, a milk based binder (Fig 9). In the apse of the Altar, for the icon of the Virgin and Child, we used egg tempera. Both of these walls are lightweight wooden structures, and could not support the heavy plaster that is required for fresco.
Conclusion
When all is finished, the technical struggles of the builders and painters are forgotten. The plaster joins disappear. The many pieces of painting, large and small, imperceptibly join together to present one single image, the transfigured Cosmos, where Christ, the Maker and Fashioner, reigns over all. We see His image and that of His holy Mother, and all the saints, and we take little or no thought for the art, the medium, or the work that has gone into the painting of the icons. It is every iconographer’s hope that his art won’t even be thought of, but rather that our Savior is clearly seen by all.
Fresco is well suited for the painting of a modern Orthodox church. The nature of the color surface of fresco makes it the medium par excellence for a building that is entirely covered on the inside with images. It is somewhat transparent, but beautifully solid. The color, which seems to be part of the fabric of the building, is light but not garish or loud. The deep blue background of a medieval Byzantine church has a quiet profundity that is impossible to fully describe. It must be seen. This environment is one in which the icons of the saints are perceived vividly but in an atmosphere of silence. Although demanding and uncompromising in its technical requirements, and exacting in its execution, fresco is not impossible to do in our time. Certain modern materials and building practices actually make it easier to use fresco in buildings that in an earlier era would not have been able to have it. It remains a simple, although perhaps not easy, medium. Its rewards (durability, beauty, transparency and depth) are more than worth the difficulties.
For more detailed technical information on fresco painting, read The Technique of Fresco Painting.
This article originally appeared in the print journal Iconofile.
Fig 8. The Altar
Fig 9. View of the church from the narthex.